31.10.10

Happy Halloween!


Pumpkin Mini Quilt


My favorite Giant's Fan


30.10.10

Fall Quilt Festival

It's time for the Fall Quilt Festival at Amy's Creative Side.  I've decided to feature my Snowball quilt completed this summer (June 2010).

Pattern: snowball with diamond border (squares set on point)
Fabrics:  various designer prints, batiks in border and corners of snowballs, Amy Butler print on back
Inspiration:  Kaffe Fassett, although I didn't follow a specifc pattern

It started out like this:

Eventually, a quilt emerged.  It took almost a year to complete the piecing and quilting.

I free-motion quilted in a swirling pattern.


*****
Thanks for stopping by! 


27.10.10

Autumn Leaves


This is as much fall color as you're going to find out my way in California.  I brought my camera and leaf blocks with me to work and while on my midday walk, I snapped these at the park.  Fortunately, there weren't too many folks out to question what the heck this strange woman was doing arranging fabric amongst the greenery.


As I walk by these manzanita bushes several times a week I often think its sinuous shapes would make a great start off point for a quilt design.
Farmer's Wife blocks
Sometime last year, my husband gave me The Farmer's Wife Sampler by Laurie Aaron Hird.  In a quest to use up some stash fabrics, I pulled out the book a few days ago and made these blocks.  Block size is 6" which makes for some pretty hairy piecing, but so far, I've stayed away from the more complicated designs.  Mostly likely, I won't be making all 111 blocks in the book - but just enough to make a modest-sized sampler.
Some more pictures from my photo shoot the other day:


****


22.10.10

Betty Dear

Let me explain.  I've been trying REALLY hard to be frugal and use up my sizable fabric stash.  But I've been drooling over Darlene Zimmerman's new fabric line "Betty Dear" and could resist no longer.  I bought the entire line in fat quarter cuts from Thecalicogirl on Etsy today.
Betty Dear
It's a huge splurge for me - I don't think I've ever bought an entire line of anything.  I already have a pattern in mind.   I think these fabrics would look great in a "wagon wheel" quilt block.  Some fabulous examples are saved in my Favorites on Flickr.

After searching through various online sources, and realizing this is a pretty straightforward pattern, I will most likely draft my own pattern.  I just need to figure out how big I want my blocks and how many spokes I want to radiate out from the center. 

Would would you do if a bundle of Betty Dear landed on your doorstep? 

19.10.10

Part II - Quilting Class

After some 6-7 years of quilting, I finally took a quilting class.  I'm so proud of myself.    My sister and I enrolled in a class on free-motion quilting techniques.  Our teacher was Lori Smith, who is a well-known quilting teacher.
Instruction sheet and practice doodles
Some things I learned, not directly related to quilting:

#1  Come prepared.   There was quite a bit of fabric and supplies prep for this class.  I was in my typical rush-rush mode, and had to throw everything together early on the morning of the class.

#2  Come really prepared.  At the last minute, I threw in some of my extra quilting feet and boy, oh boy, am I glad I did (will explain this later!).

#3  Never go anywhere your machine without a 2 wheeler cart.  Oy.  My machine weighs a TON and the class was located in the hotel next to the convention center parking.  It was a schlep and I ended up busting off the pin that holds a secondary spool of thread on the top of my machine.

Amazingly, I arrived at class with everything I needed.  However, my trusty old free-motion foot would not work!  No matter what I did .... I changed my needle, re-threaded my machine, turned the power on and off, etc.  I actually began to lose my cool as I envisioned having to leave the class before making a single stitch because I was dead in the water.  Then, I had a stroke of genius.  Why not try the extra foot I had thrown in my bag as an afterthought?.  I was pretty sure it was an open-toe free-motion foot .  It was much "clunkier" looking than the other foot, and I had never tried it, but at that point, I didn't have anything to lose.  And it worked.  And worked like a charm.  Phew!!

Here's my first piece.  We were instructed to stitch the straight lines first, then fill in the pattern with a meander.  This was very straightforward for me, but a good warm up.  I learned a couple of useful things. 

First, if you tend to get puckers when you straight line quilt, it may be that the top, batting and back fabric grain lines aren't oriented in all the same direction.  We were directed to stitch with the crosswise grain first (which has more stretch), before the lengthwise grain.  Little did I know, even the batting has more stretch in a given orientation (just give it a little tug to determine this before creating your quilt sandwich).

Secondly, I very lazily have never brought up the bottom thread to the top of my piece at the beginning of free motion stitching.  New to this technique, it went agonizingly slow, and as I was already behind with my work due to the snafu with my darning foot, so I ...ahem...cheated a bit, and left some of my threads on the back.  However, this is something I will be working on at home, from now on.

Photographed from back-side. 
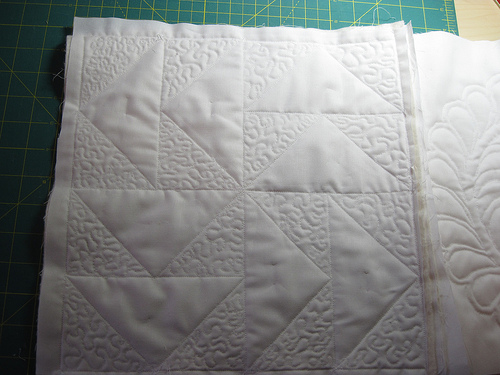
Next, we free-motion quilted a feathered wreath from a template and our last block was more improvisational.  We were supposed to practice stitching with a double-needle, but true to form, my machine wouldn't cooperate, so I experimented with one of my decorative stitches instead.

Unfinished block
I didn't have time to finish my piece - we were to sew the three blocks together to create a panel.  Our teacher taught us a fun "quilt as you go" technique which I'll demonstrate at a later time.

All in all, the class was both a great learning experience and an opportunity to spend time with my sister.  I left the class reenergized and can't wait to tackle some of my WIP tops!

18.10.10

A Quilting Weekend - Part I - Pacific International Quilt Festival

This weekend was all about quilting!  My sister and I signed up for an all day quilt class at the Pacific International Quilt Festival in Santa Clara on Saturday and since we knew we'd be tied up in the class all day, we decided to take the day off work to see the show on Friday.  And I'm so glad we did!

Quilt by Gloria Loughman
Isn't this the most fantastic quilt?  Although it was almost impossible to chose a favorite, this was definitely one of mine.  It was part of a small exhibit of quilts by Ms. Loughman called "A Slice of Oz".  We saw so many quilts - it made my head swim. Toward the end of our allotted time (10-4) with a short break for lunch, we realized we hadn't seen the quilts at the back of the convention center and were literally running down the last few aisles.

Although we did a pretty good job staying away from the vendor stalls, I couldn't resist these gorgeous hand-dyes from Cherrywood fabrics.
 I have been admiring  Cherrywood fabric for ages, but it's the sort of thing I like to see and touch in person before buying.  I was so glad to see they had a booth at the Festival.  I purchased two fat quarter packs and a pattern with the intention of making a small wall quilt for my sister's sun room.

Here's my entire (quilt-related, that is...ha ha) haul:


My sister was very drawn to this pixelated-looking quilt.
My sister
 I have a few more pictures from the show on flickr under the quilt show set (see display in the right-hand column of my blog).

As much as I could have lingered for several more hours I had to drive back to the City thru rush hour traffic, pick up my daughter from school, grab takeout for a quick dinner before going to a play with my family.  The play (Scarpin at ACT), was fabulous (the two glasses of champagne helped).   I felt I had way too much going on this weekend to be able to devote two days to myself, but I won't bore you with the details.  Fortunately my husband was managing all of the kids' activities.  I had to figure out when in the heck I was going to find the time to prep my fabric and supplies for my quilt class the next morning.  I set my alarm clock for 6 am.....

Coming up next:
Part II:  Quilting Class 

12.10.10

Still Destashing - Maple Leaf Blocks

The idea was to make Maple Leaves for my month of the Shrinking Quilters' Bee but they turned out to be a bit fiddly so I put aside my mangled test blocks to work on getting my Bee packages together and out the door before returning to these leaves. Still intent on using up some fabrics from my stash I've thrown in some oldies including some wonderful Lonni Rossi prints I picked up in Iowa several years ago.


The block pattern is from quilterscache and is called Border Maple.   The suggested layout calls for setting blocks on point and adding corners (setting triangles) and then adding scrappy sashing. 


And as I mentioned earlier, this is my month to lead the Incredible Shrinking Quilters' Bee.  I chose the classic Ohio Star block. 


Bee info can be found here and here.